SDK tutorial (C# version)
1. Overview
-
This tutorial is an introduction of how to use our SDK (C# version). This SDK toolkit is designed to assist engineers in AI visual development. To engage in software development, you need to download it from our official website:
-
Model files trained on our official website
-
SDK (C# version) toolkit
-
2. Environment setup
-
Supported OS versions: Windows 10/11 X64 Platform
-
Supported .NET Framework versions: .NET Framework 4.6.1 (recommended) and .NET Framework 4.0 (Files in SDK toolkit are set to the default version .NET Framework 4.6.1. If you want to use .NET Framework 4.0, please pay attention to following BOLD sections.)
This SDK toolkit only works on Nvidia GPUs. AMD and other brands are not supported!
-
Supported GPU types: NVIDIA GPUs with compute capability "6.1", "7.5", and "8.6". For specific GPU type, please refer to the "Select Your Hardware" section in the "Model Download" page on our official website.
 You can find the compute capability of NVIDIA GPUs from here.
 -
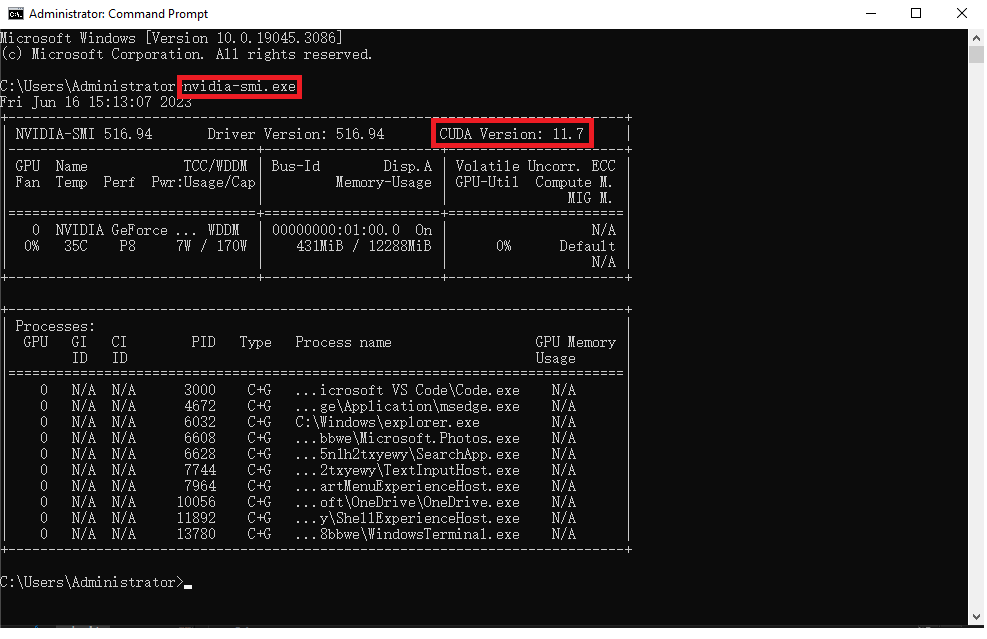
Supported Nvidia driver versions: cuda version >= 11.6. (To check your cuda version, please enter nvidia-smi.exe in your command prompt)
 You can download Nvidia drivers from here

-
Environment Dependencies: Visual Studio 2017 or above. You can download Visual Studio from here. After downloading Visual Studio, proceed with the installation and make sure to select ".NET Desktop Development" and "Universal Windows Platform development" options.
-
If you have already downloaded Visual Studio, please follow these steps:
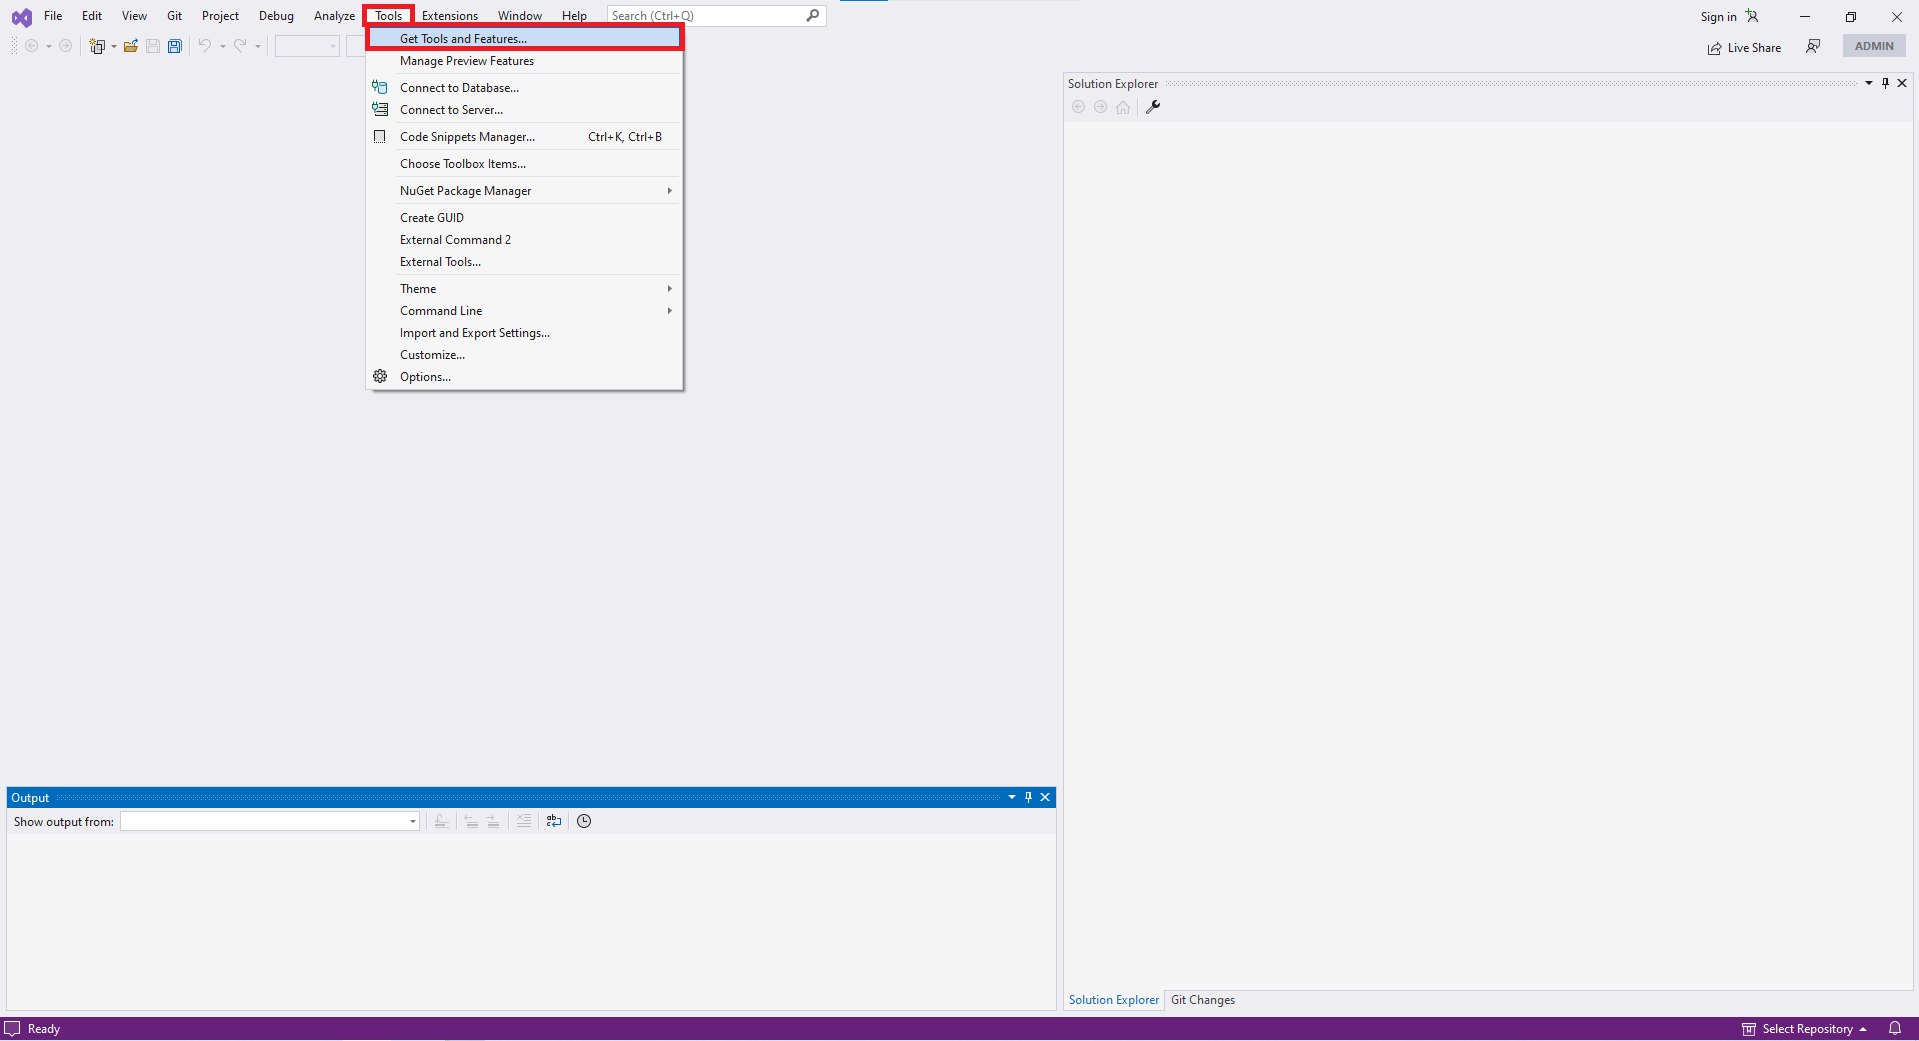
- Click on "Tools" and "Get Tools and Features" to navigate to the installing page.
- In the "Workloads" tab, check ".NET desktop development" and "Universal Windows Platform development".

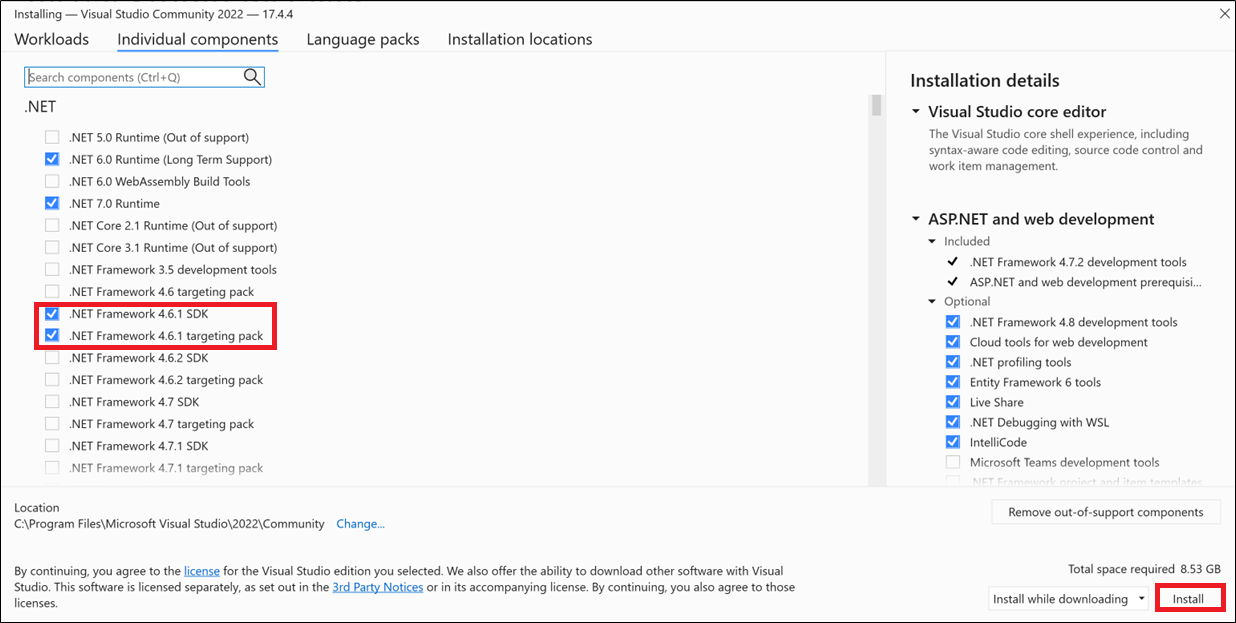
- In the "Individual components" tab, check ".NET Framework 4.6.1 SDK" and ".NET Framework 4.6.1 targeting pack" (If you need .NET Framework 4.0, check the corresponding 4.0 options.). Then, click on "Install."
- Click on "Tools" and "Get Tools and Features" to navigate to the installing page.
3. Quick start with SDK
- Here is an example (Visual Studio 2022, .NET Framework 4.6.1) to help you quickly understand how to use the SDK for C# software development.
3.1 Create a new project
-
Open Visual Studio and click on “Create a new project.”

-
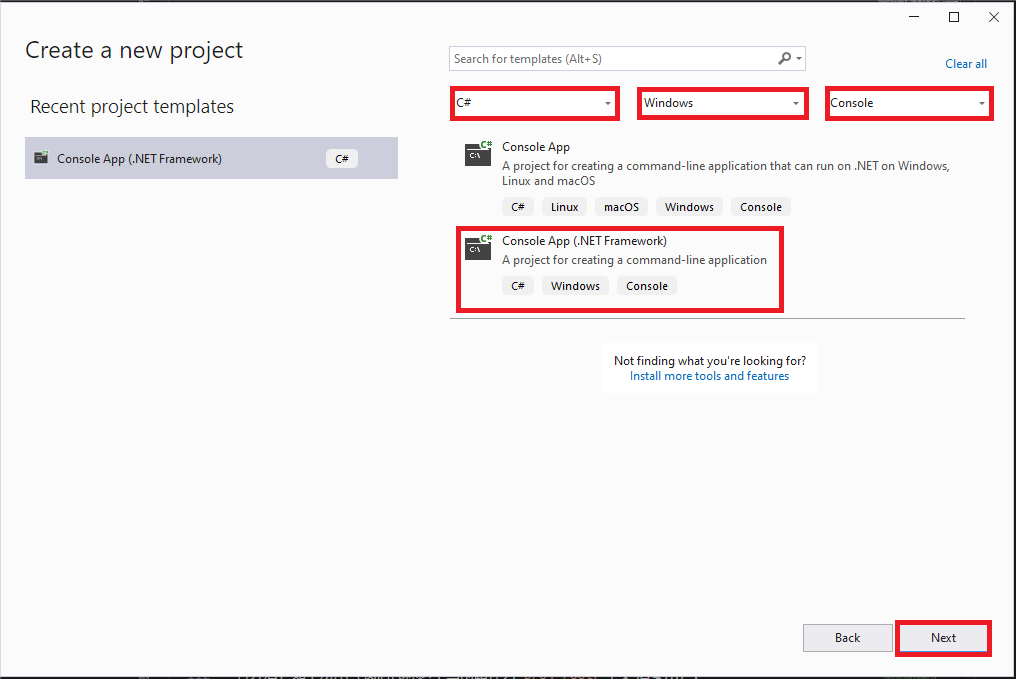
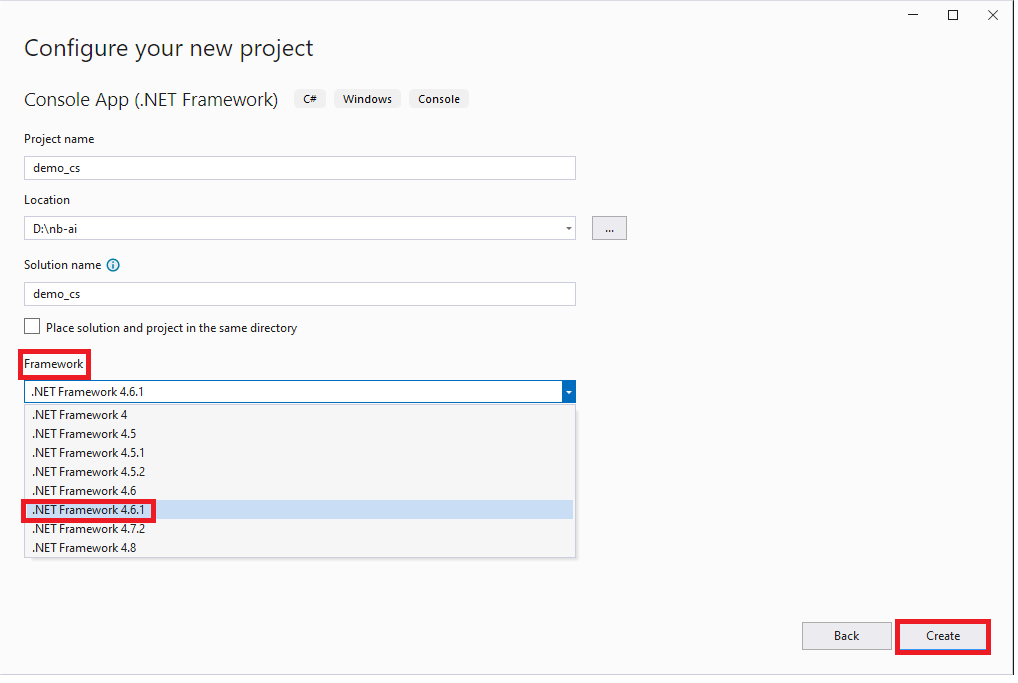
Select "C#", "Windows", "Console", and "Console App (.NET Framework)." Click "Next."
-
In the "Framework" section, select ".NET Framework 4.6.1" (If you are using ".NET Framework 4.0", please select ".NET Framework 4"), and click on "Create."
3.2 Change solution configurations and platforms
-
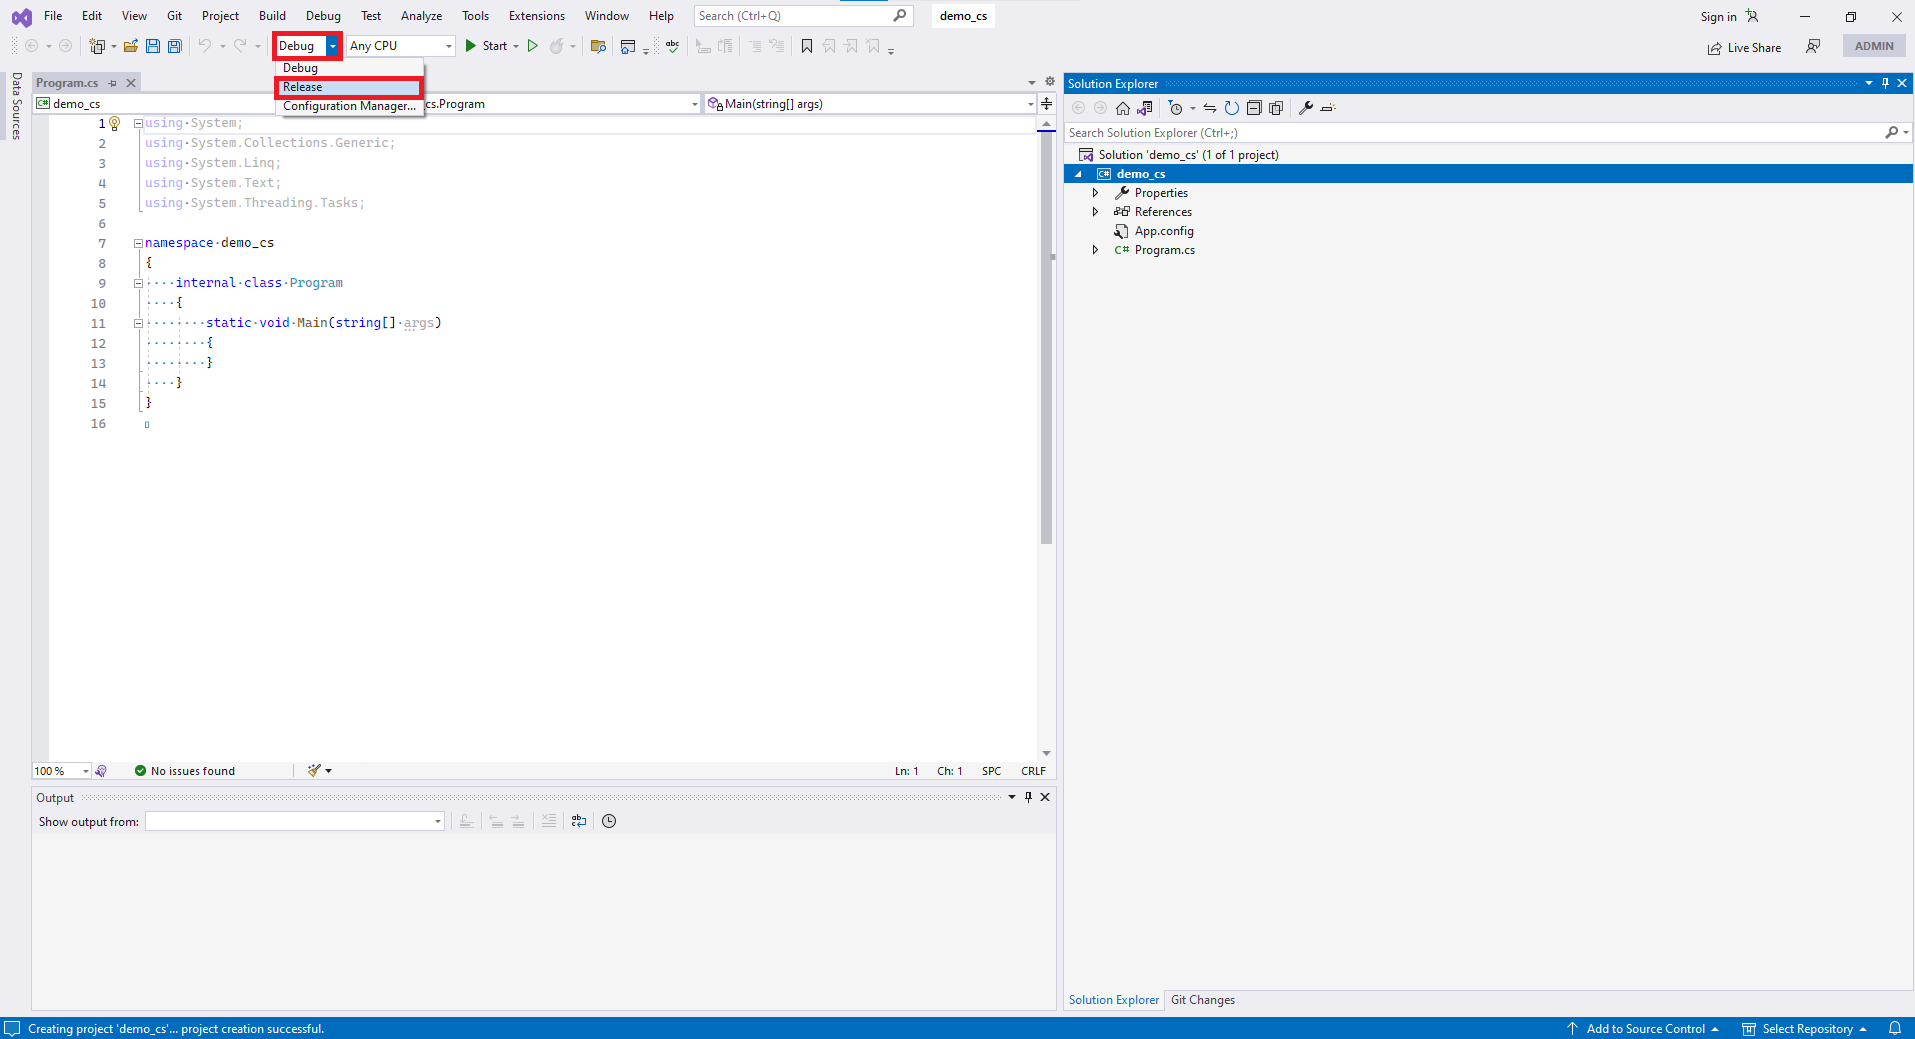
In "Solution Configurations," select "Release."
-
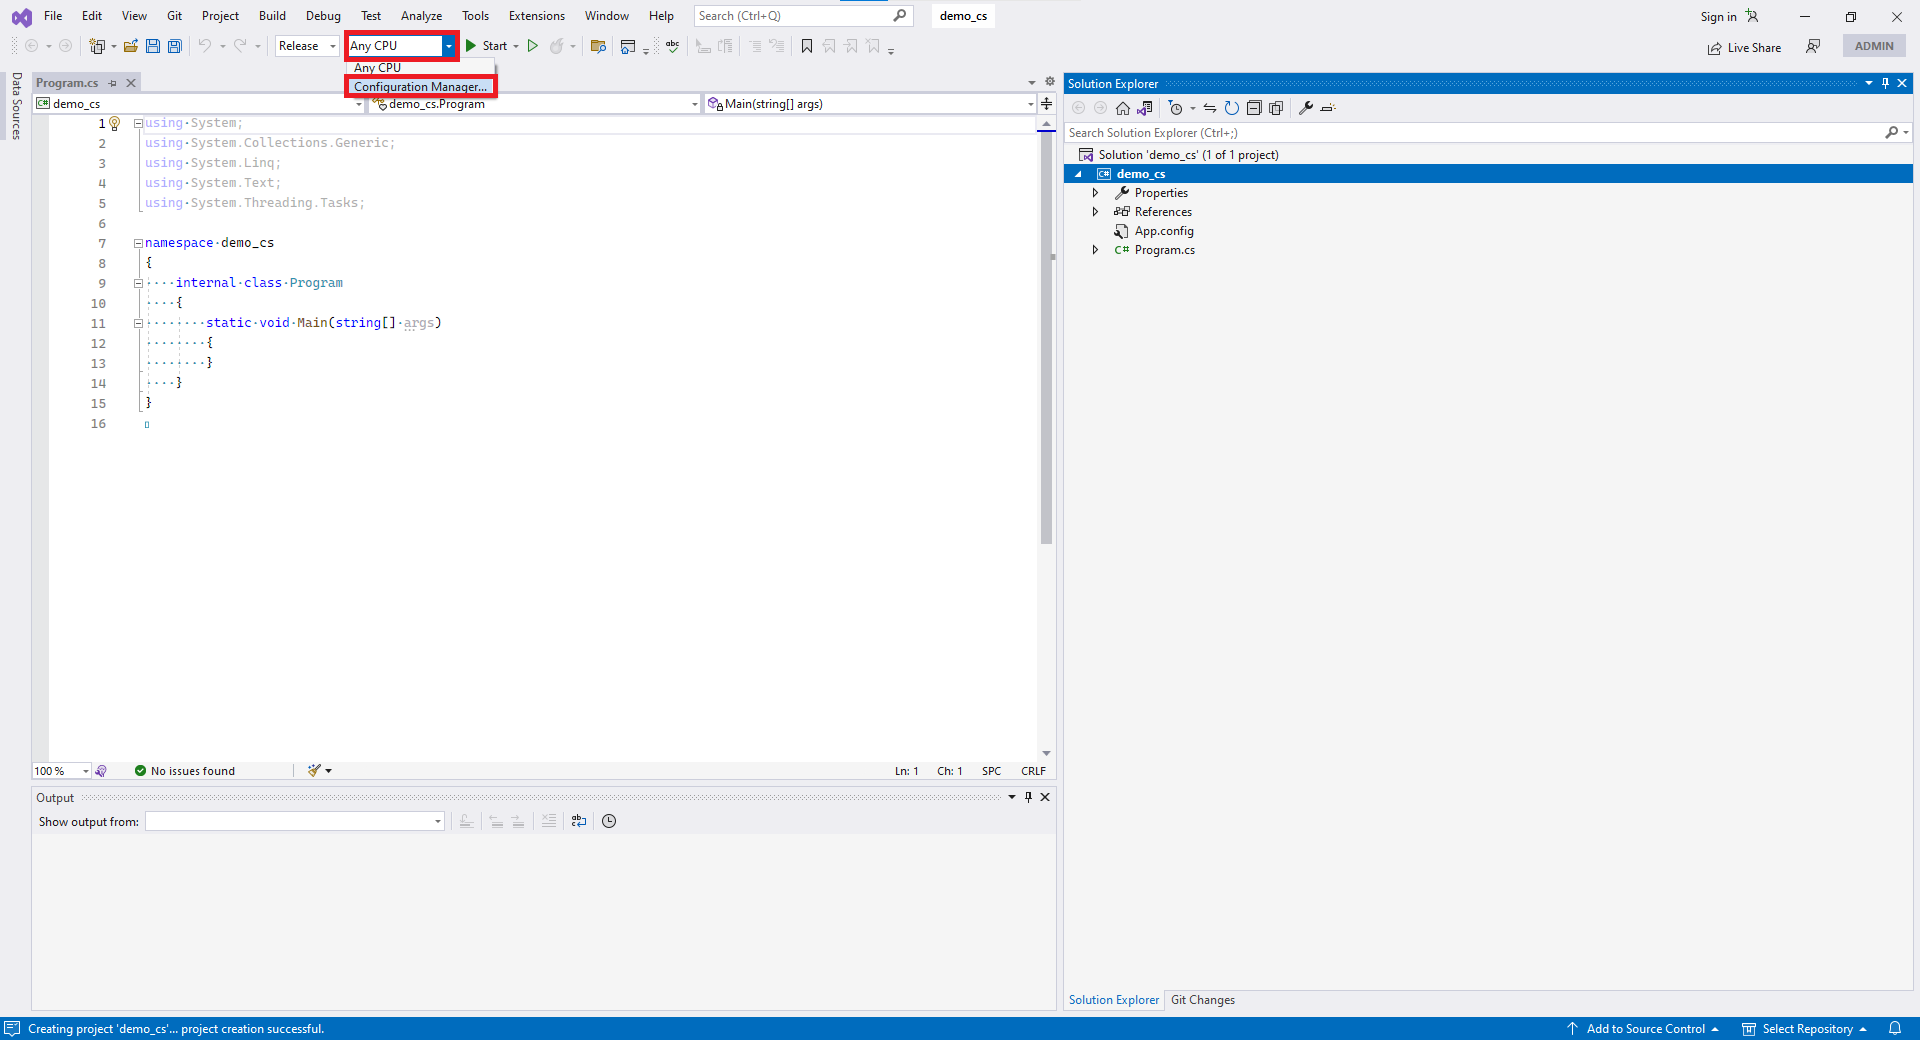
In "Solution Platforms," select "Configuration Manager."
-
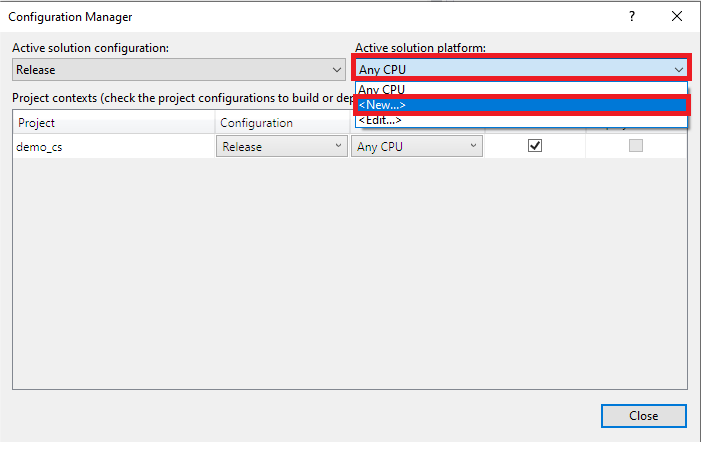
In "Active solution platform," select "<New...>."
-
Select "x64"
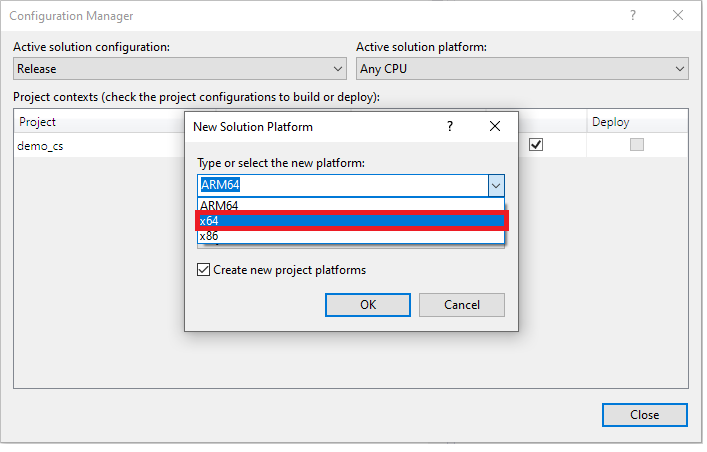
-
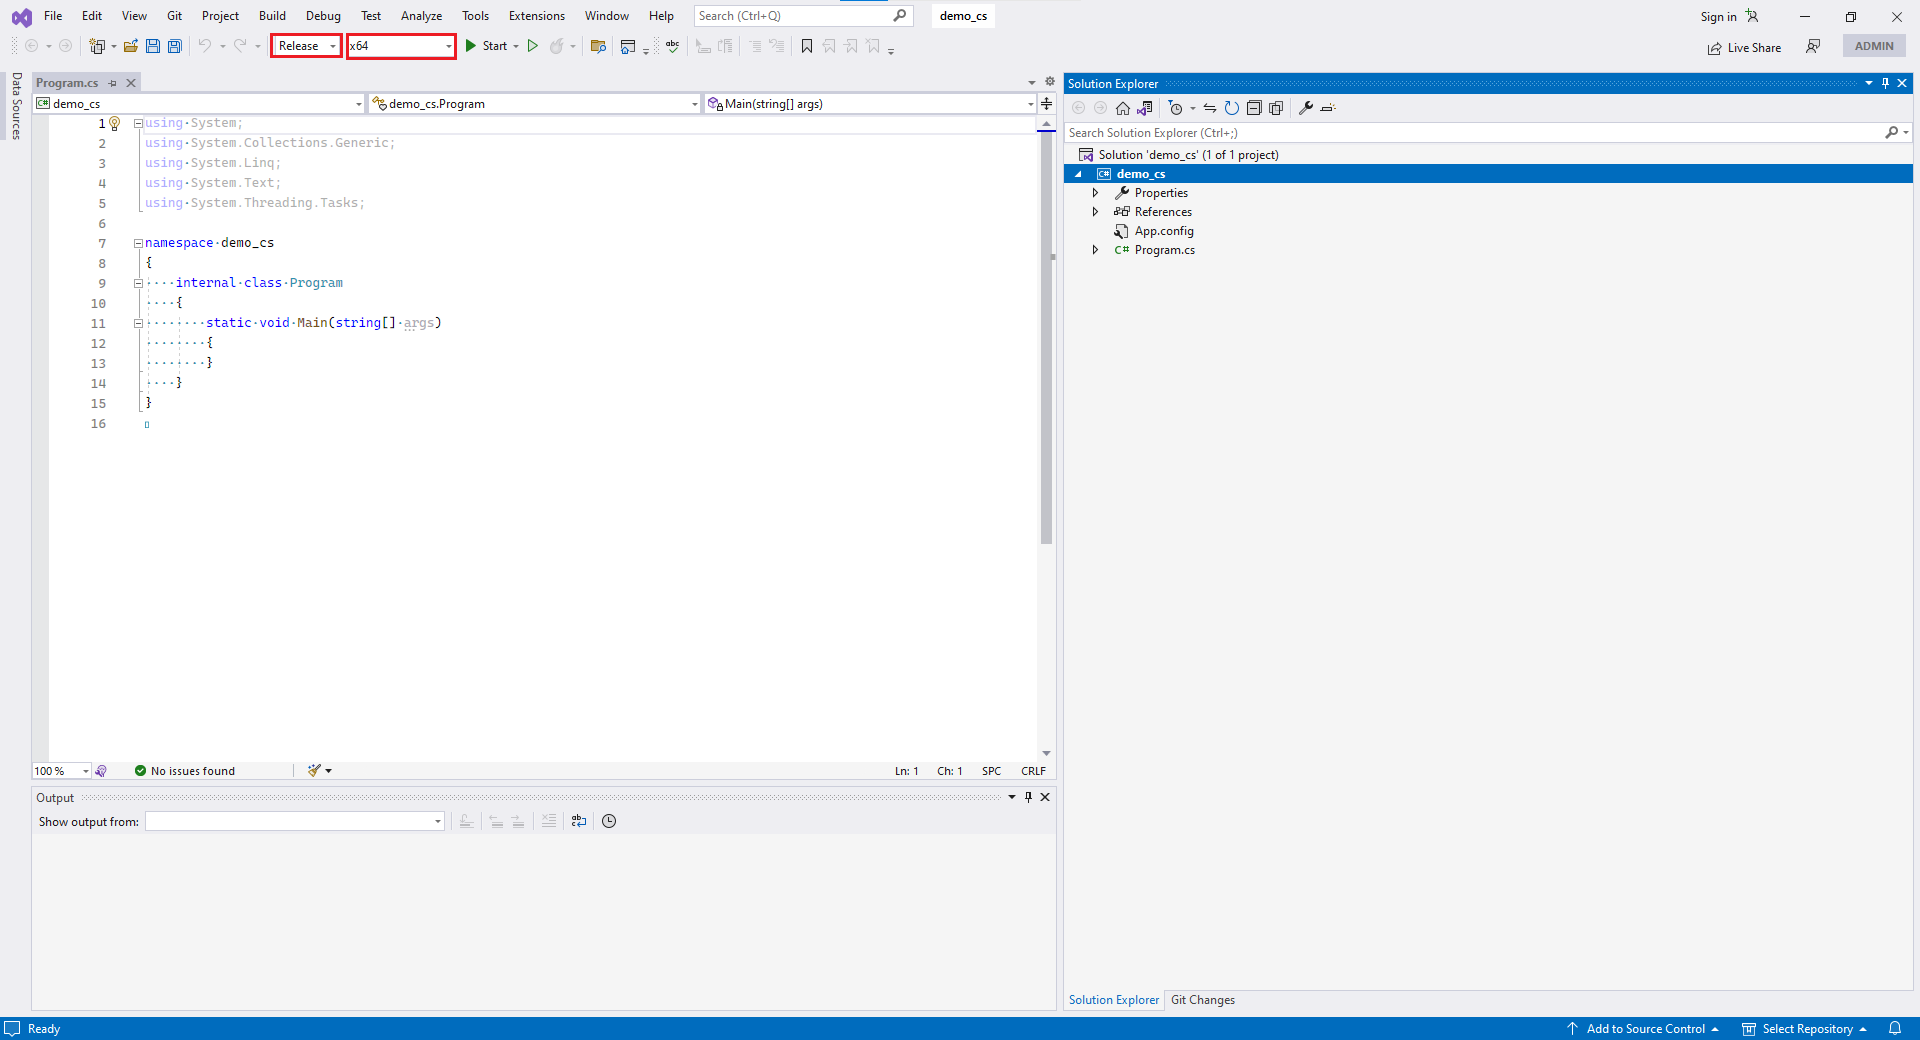
Now your solution configuration and platform are "Release" and "x64."
3.3 Unzip the SDK toolkit
-
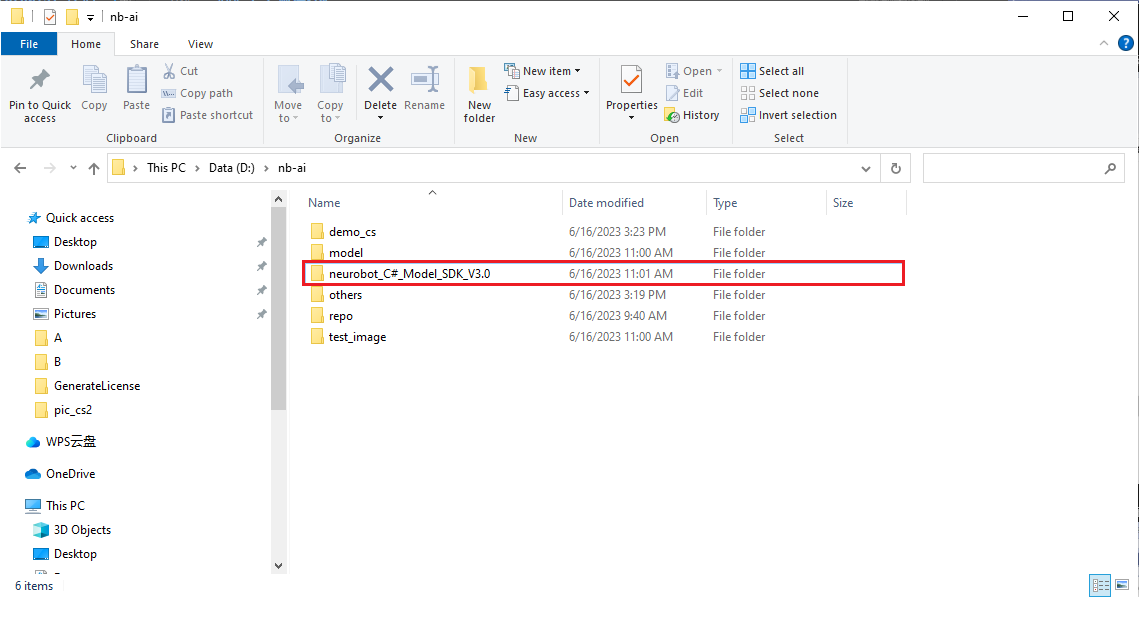
Extract the downloaded SDK file to a secure location (please do not delete it because it will be referenced). Here is an example:
-
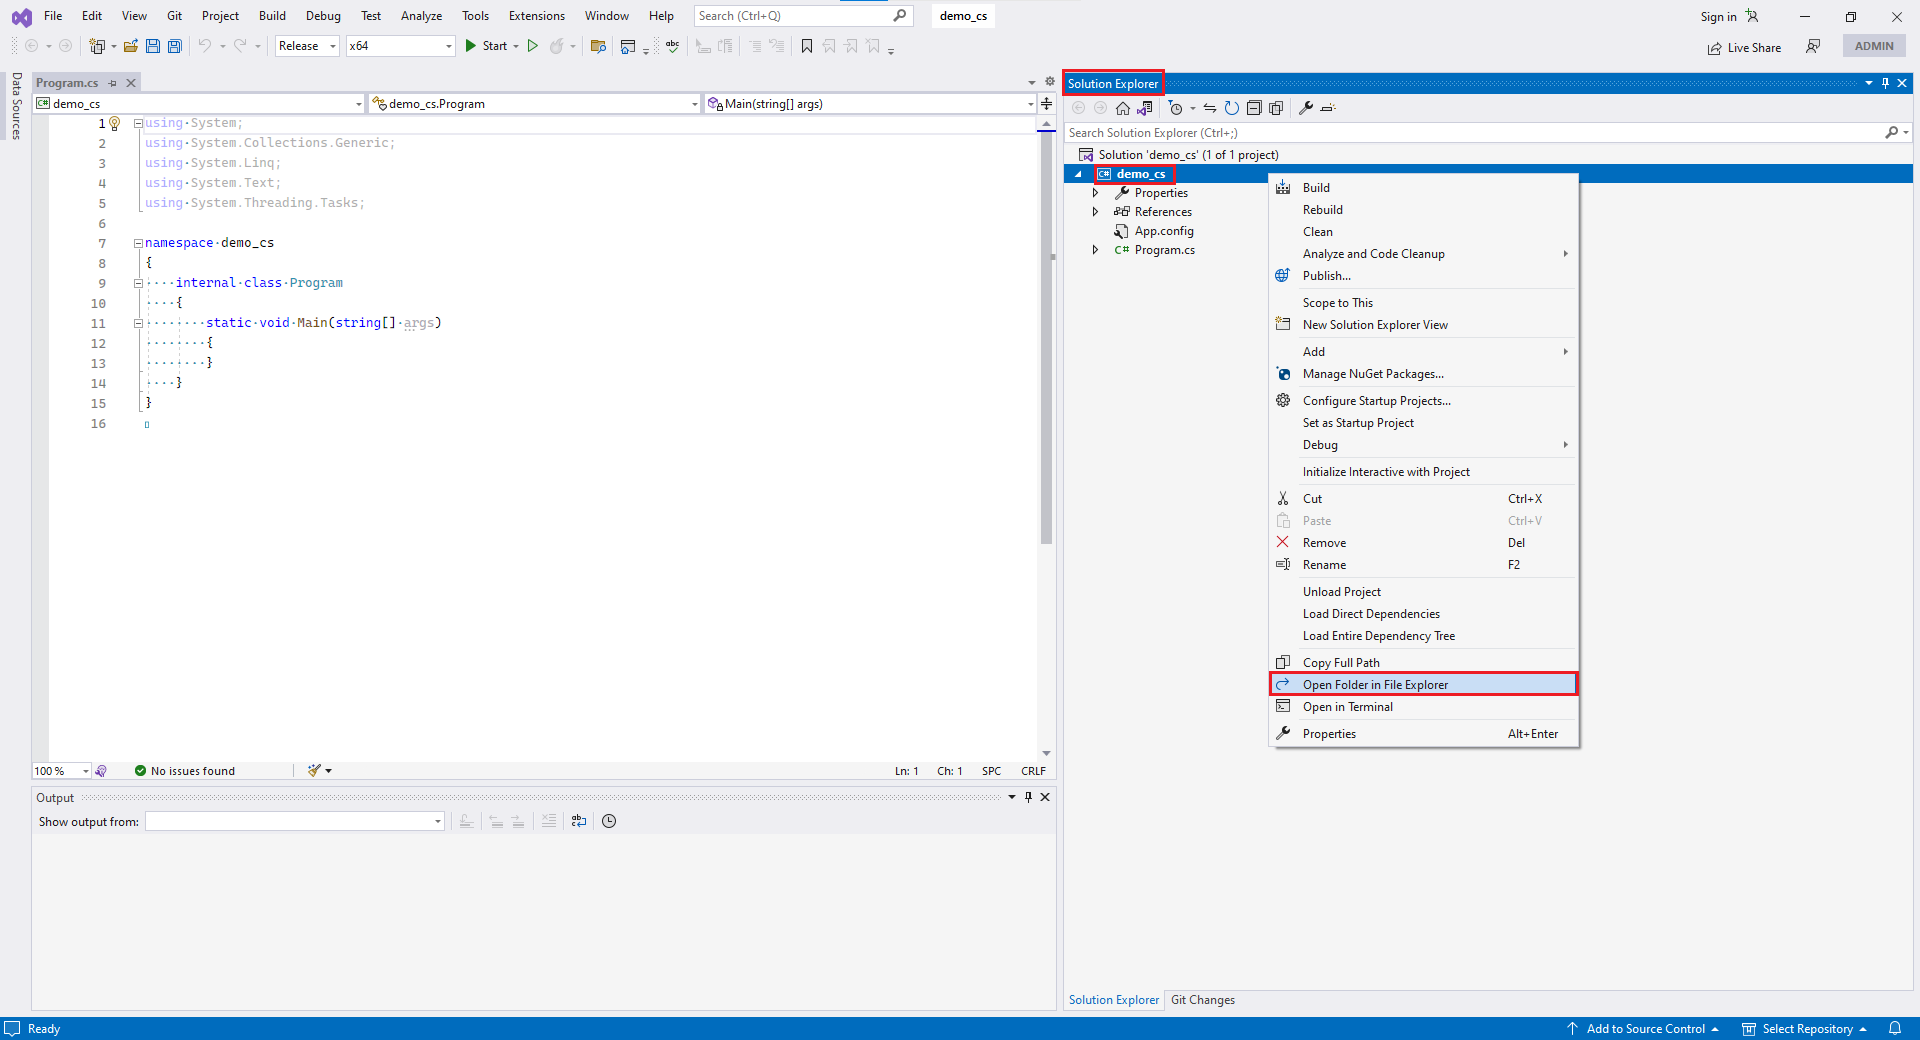
Go back to Visual Studio. Under "Solution Explorer," right-click on your project name and then click on "Open Folder in File Explorer."
-
After opening it, it should appear as shown below (let's refer to this current path as
proj_root/for now, as it will be used later):
-
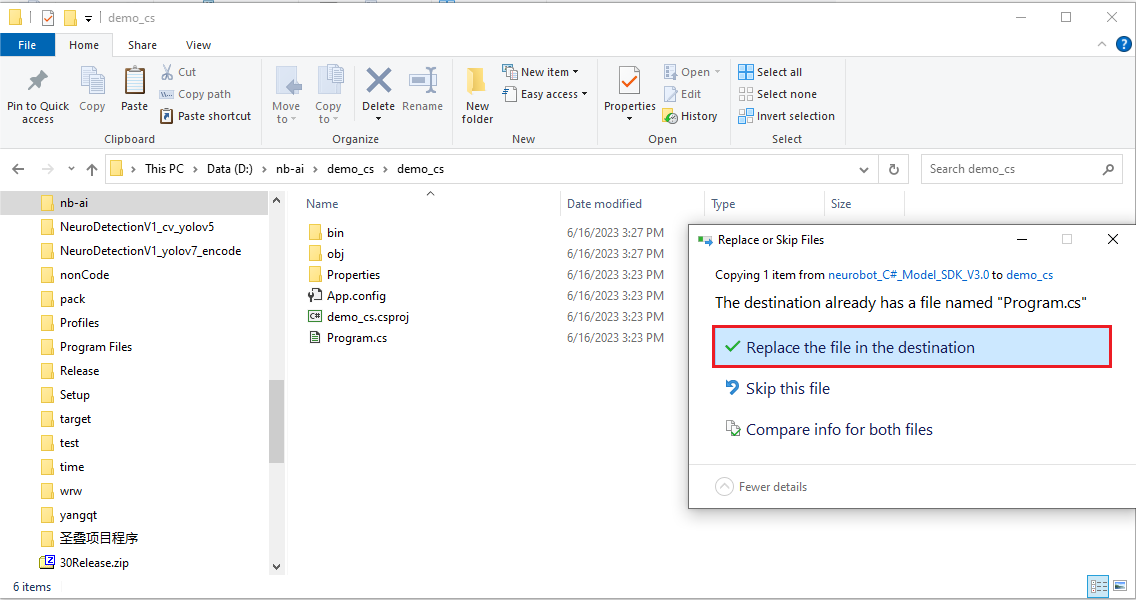
In the SDK folder, copy the
Program.csfile and paste it into theproj_root/directory, replacing the existing file.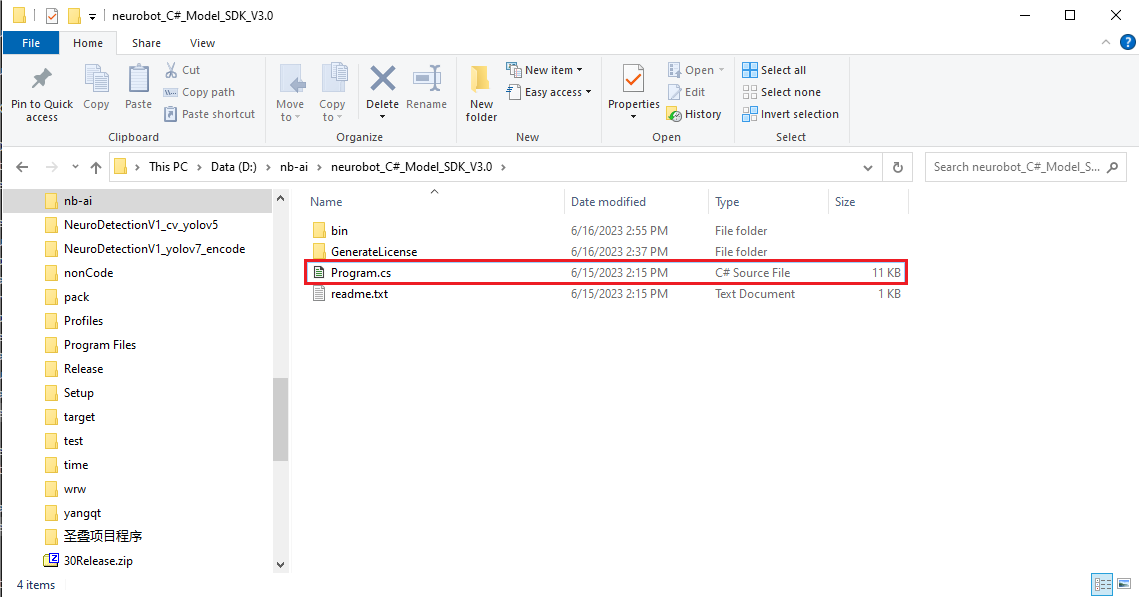
-
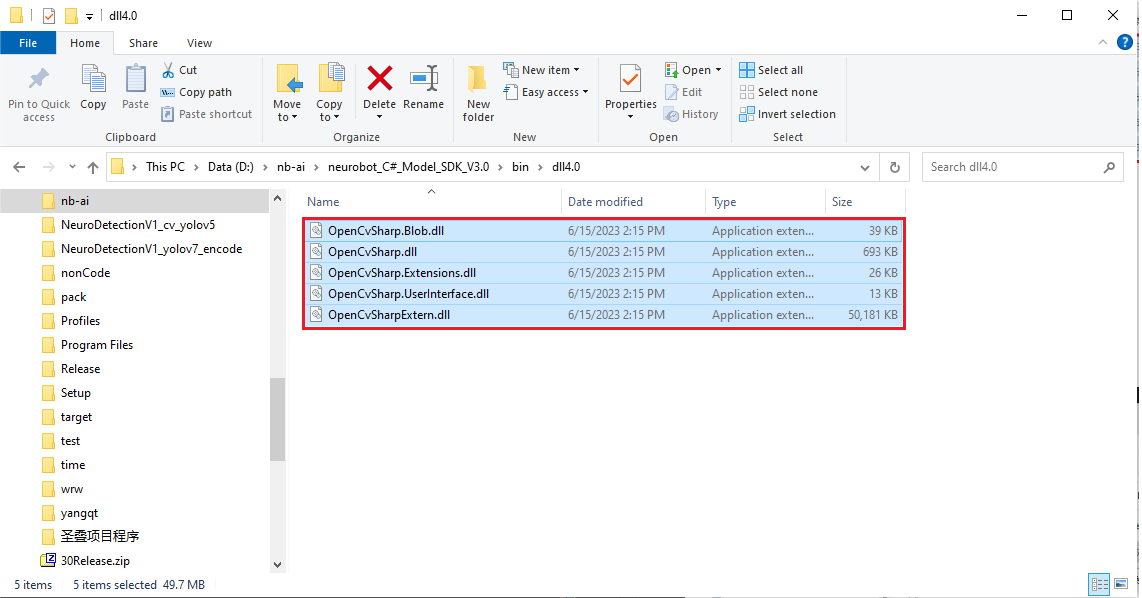
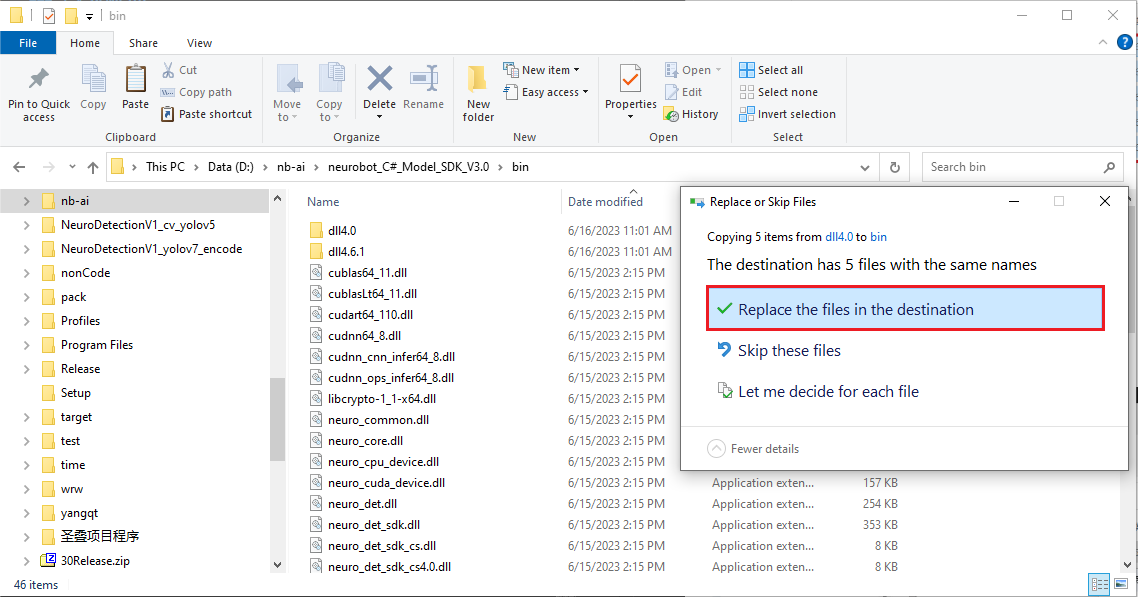
If you are using the ".NET Framework 4.0" framework, you also need to perform the following steps:
- Go to the
bin/directory in the SDK folder. Inside, navigate to thedll4.0/folder. - Copy all the files from this interface and paste them into the
bin/directory of the SDK folder, replacing the existing files.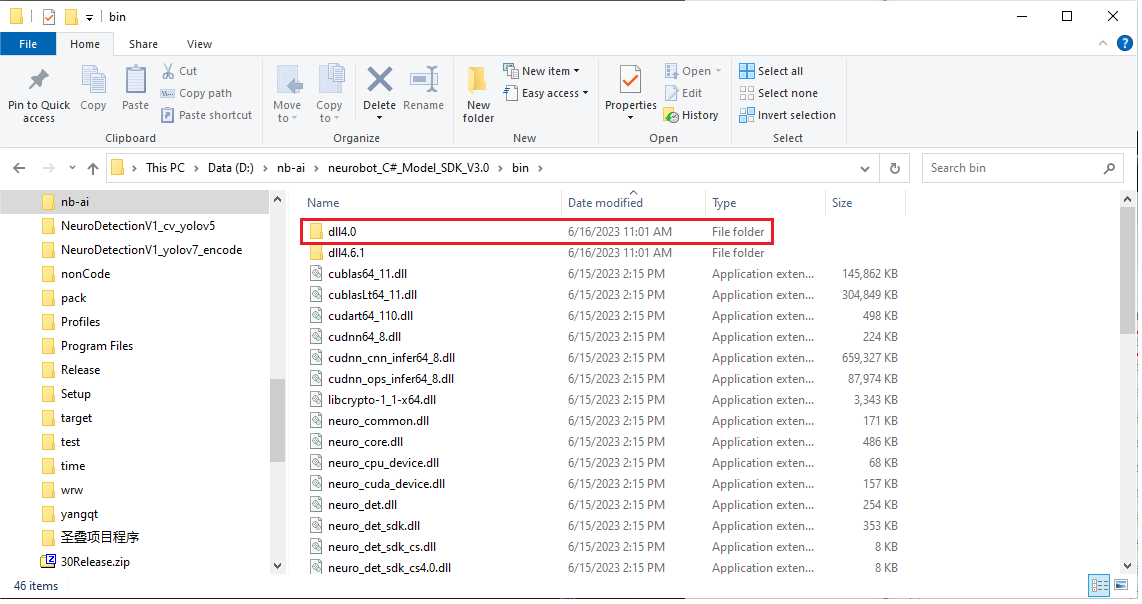
3.4 Add references
-
Go back to Visual Studio. Under "Solution Explorer," right-click on "References," and then click on "Add Reference."
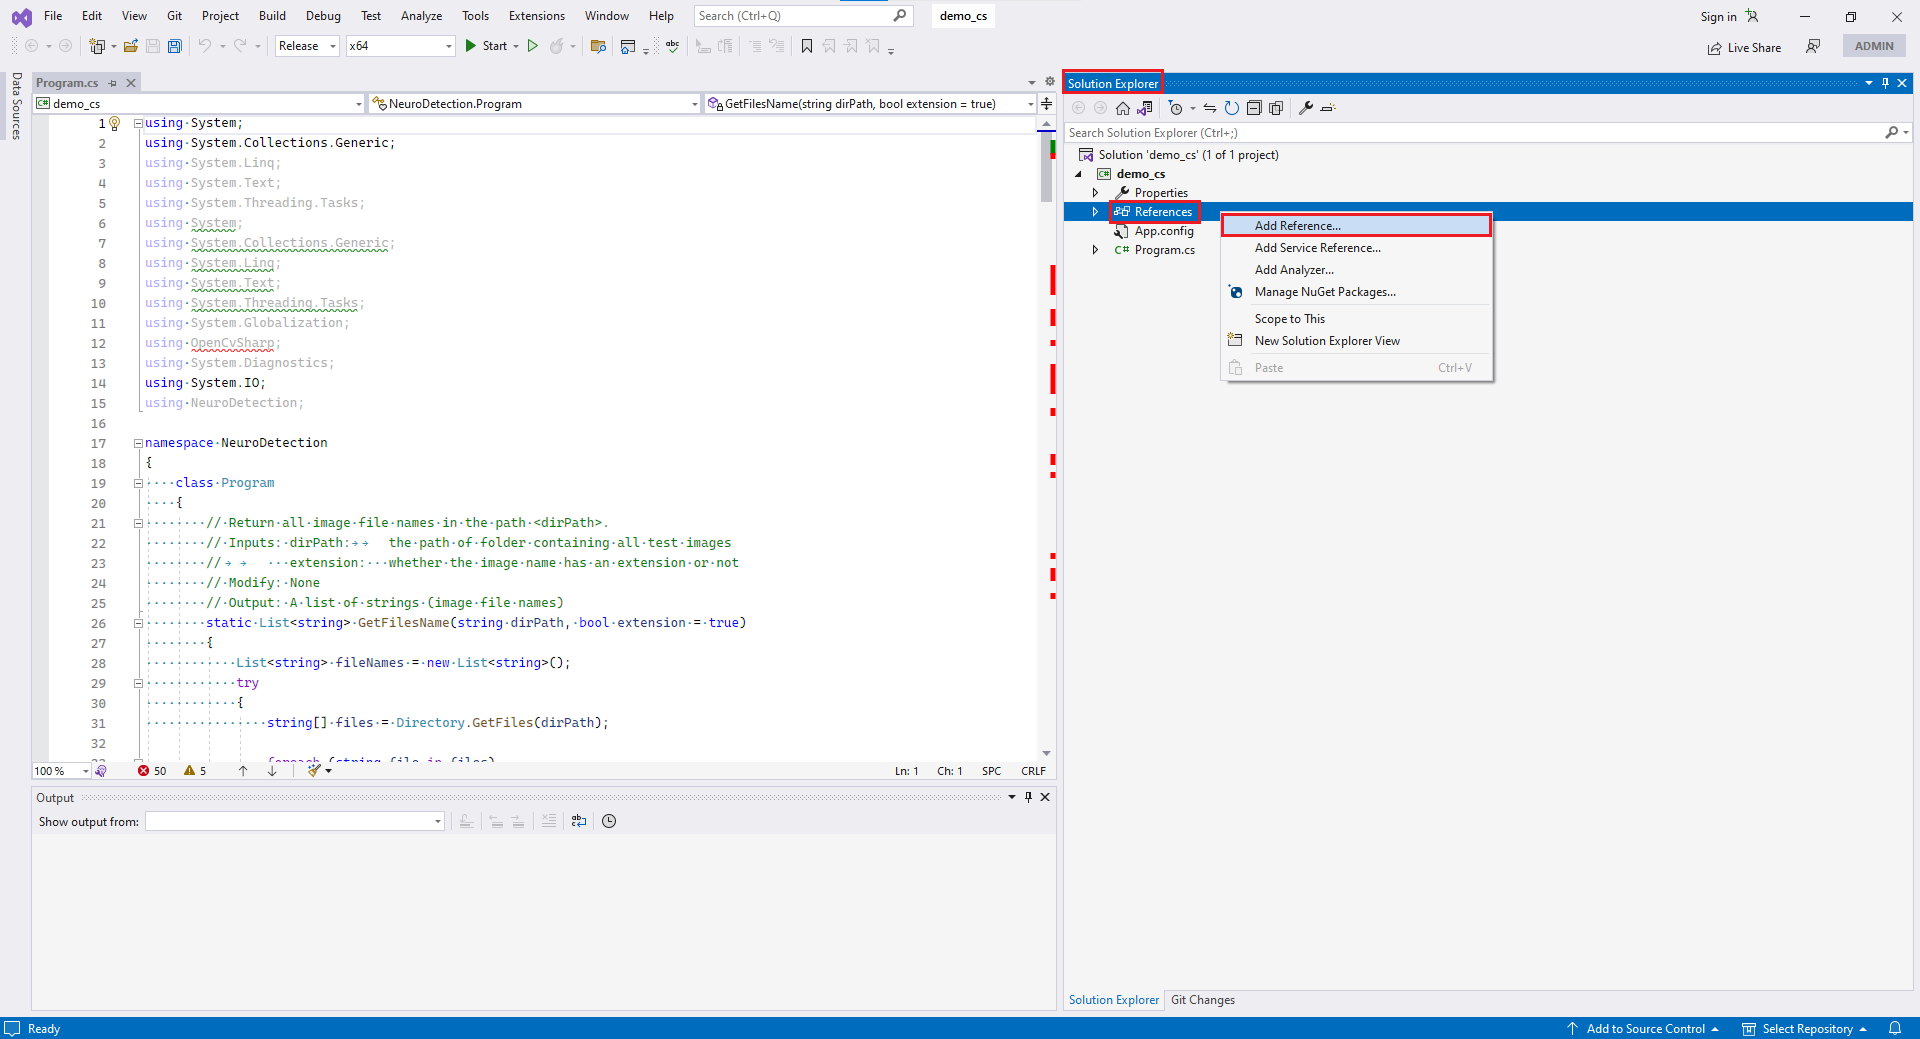
-
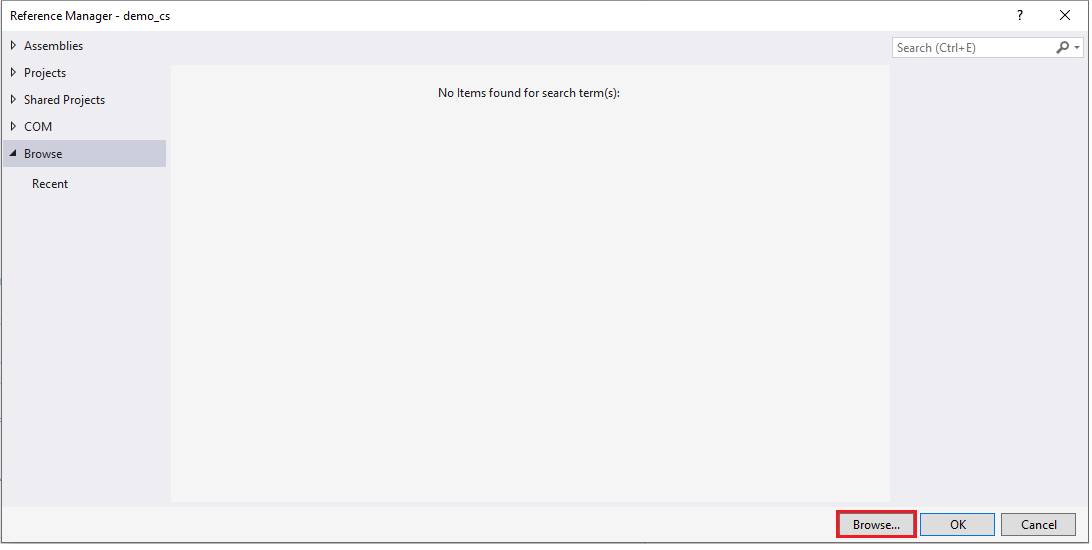
Select "Browse"
-
In the SDK's
bin/folder, select the following three files and click "OK":neuro_det_sdk_cs.dllOpenCvSharp.dllOpenCvSharp.Extension.dll
-
If you are using the .NET Framework 4.0, please select:
neuro_det_sdk_cs4.0.dllOpenCvSharp.dllOpenCvSharp.Extension.dll
3.5 Add environment variables
-
Let's proceed with adding system environment variables. Open "This PC," right-click on an empty area, select "Properties," click on "Advanced system settings," and then click on "Environment Variables." Then, the following interface will appear. Select "Path" and click on "Edit."

-
Click on "New" and then click on "Browse."
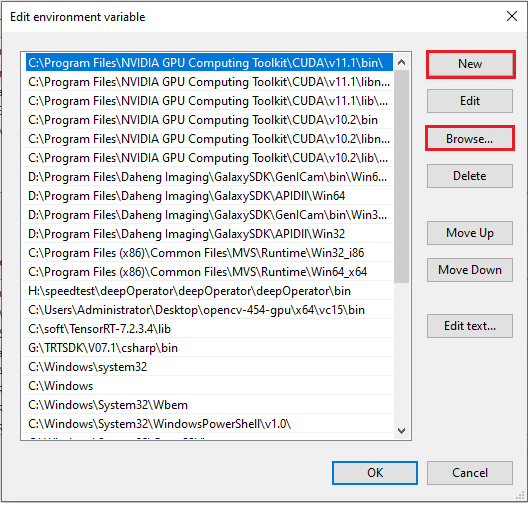
-
Choose the
bin/folder in the SDK directory.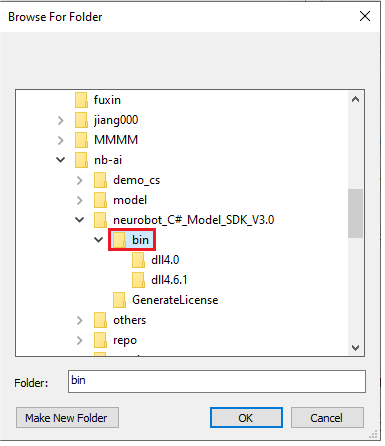
-
Move this environment variable to the top.
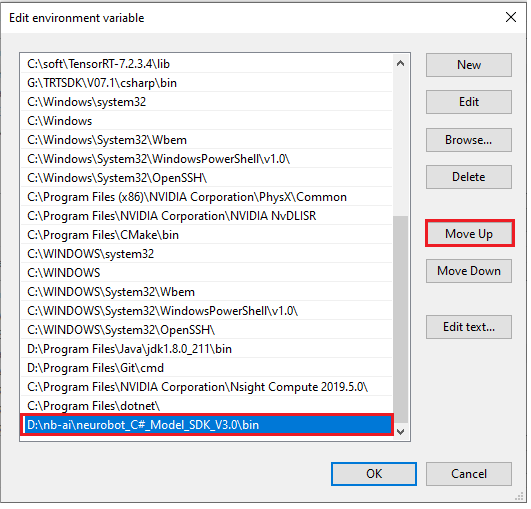
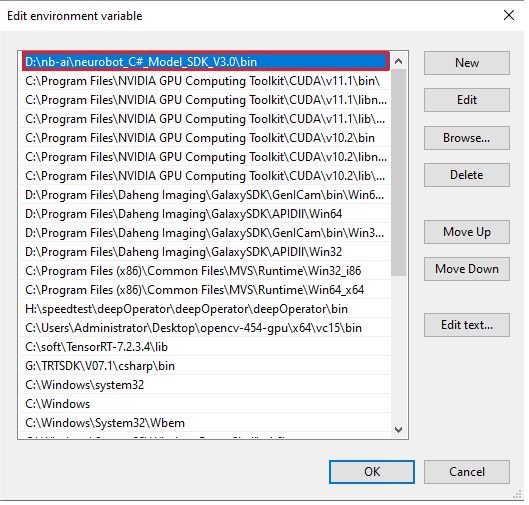 Click "OK."
3.6 Restart Visual Studio
3.7 Setup License
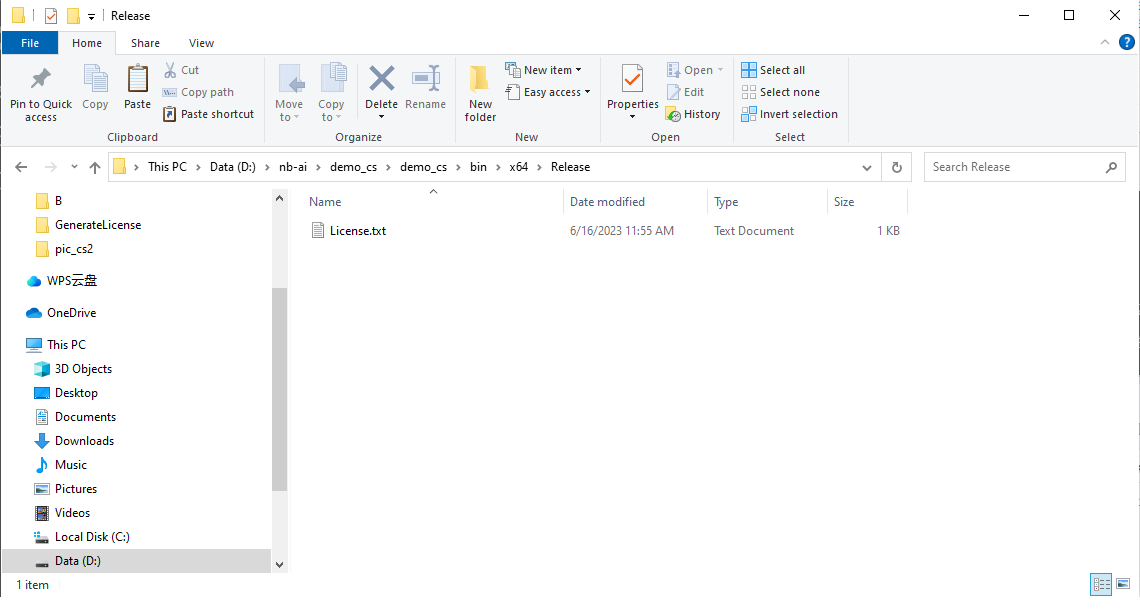
- Place the
License.txtfile in theproj_root/bin/x64/Release/folder (Please refer to the current document for the accurate location to place theLicense.txtfile).
 For instructions on how to generate the License.txt file, please refer to here.
3.8 Modify demo code
-
The
Program.csfile located in theproj_root/directory provides an example of how to perform model prediction on test images. Users only need to make few simple modifications to theProgram.csfile. -
In the
Mainfunction of theProgramclass under theNeuroDetectionnamespace, there are four lines withTODO:comments. They correspond to the image folder path (imageFolderPath), model folder path (modelPath), model name (modelName), and device name (deviceName). Please modify the values of these four variables. -
Note: You can freely choose the
modelNamebut make sure it is unique. ThedeviceNamecan only be either"cpu"or"cuda". -
For example:
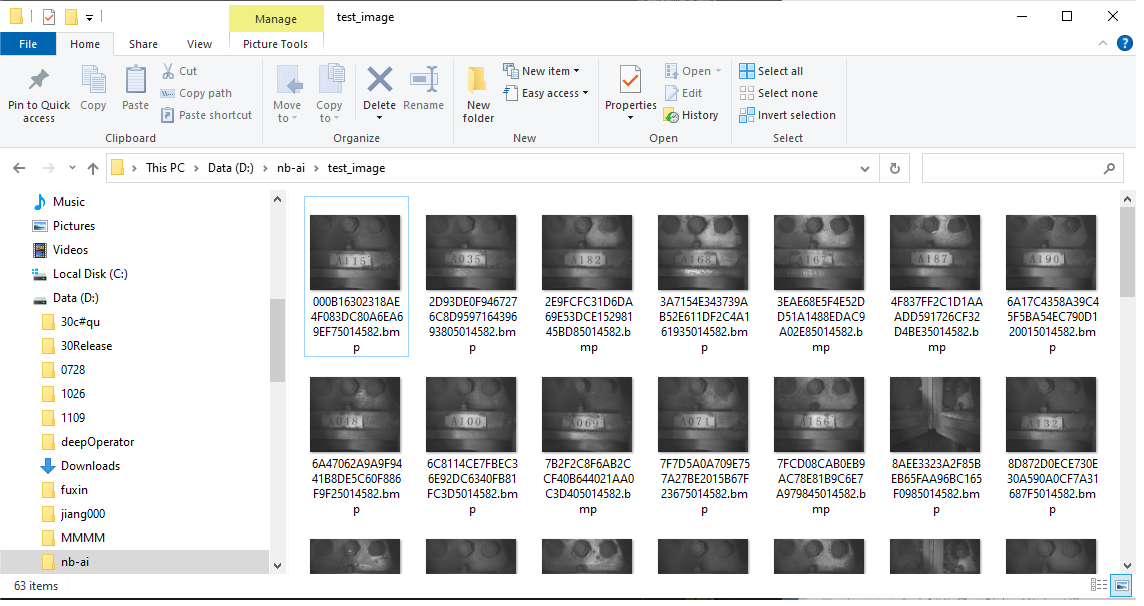
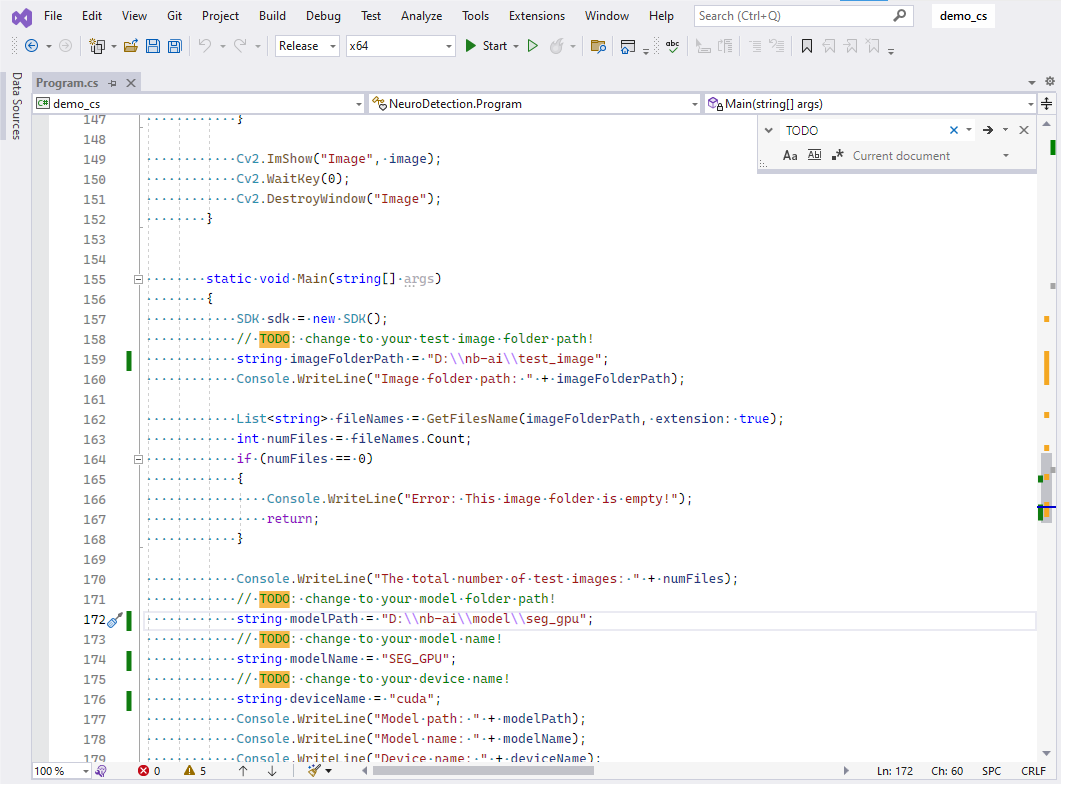 Test images folder path
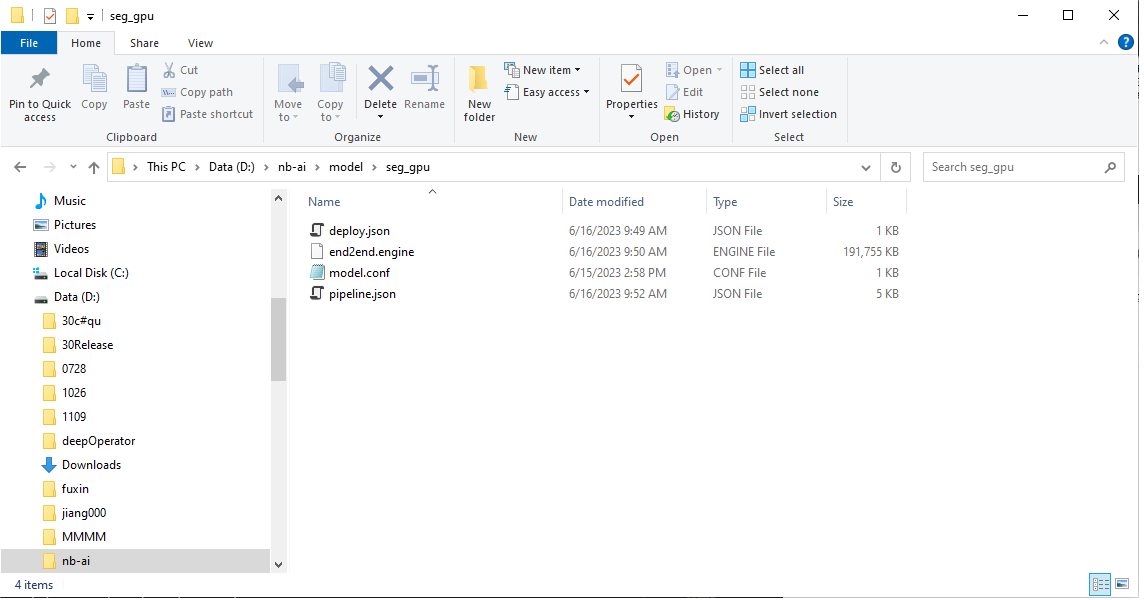
 Model folder path
-
Apart from four
TODO:comments in theMainfunction, there are alsoTODO:comments in other functions such asDrawBox,DrawInfo, andDisplayResults. Please carefully read these comments and modify the values or code according to your needs.
3.9 Run the program
-
Now, let's run the program. Go back to Visual Studio, and then open the
Program.csfile. Click on "Start" to run the program.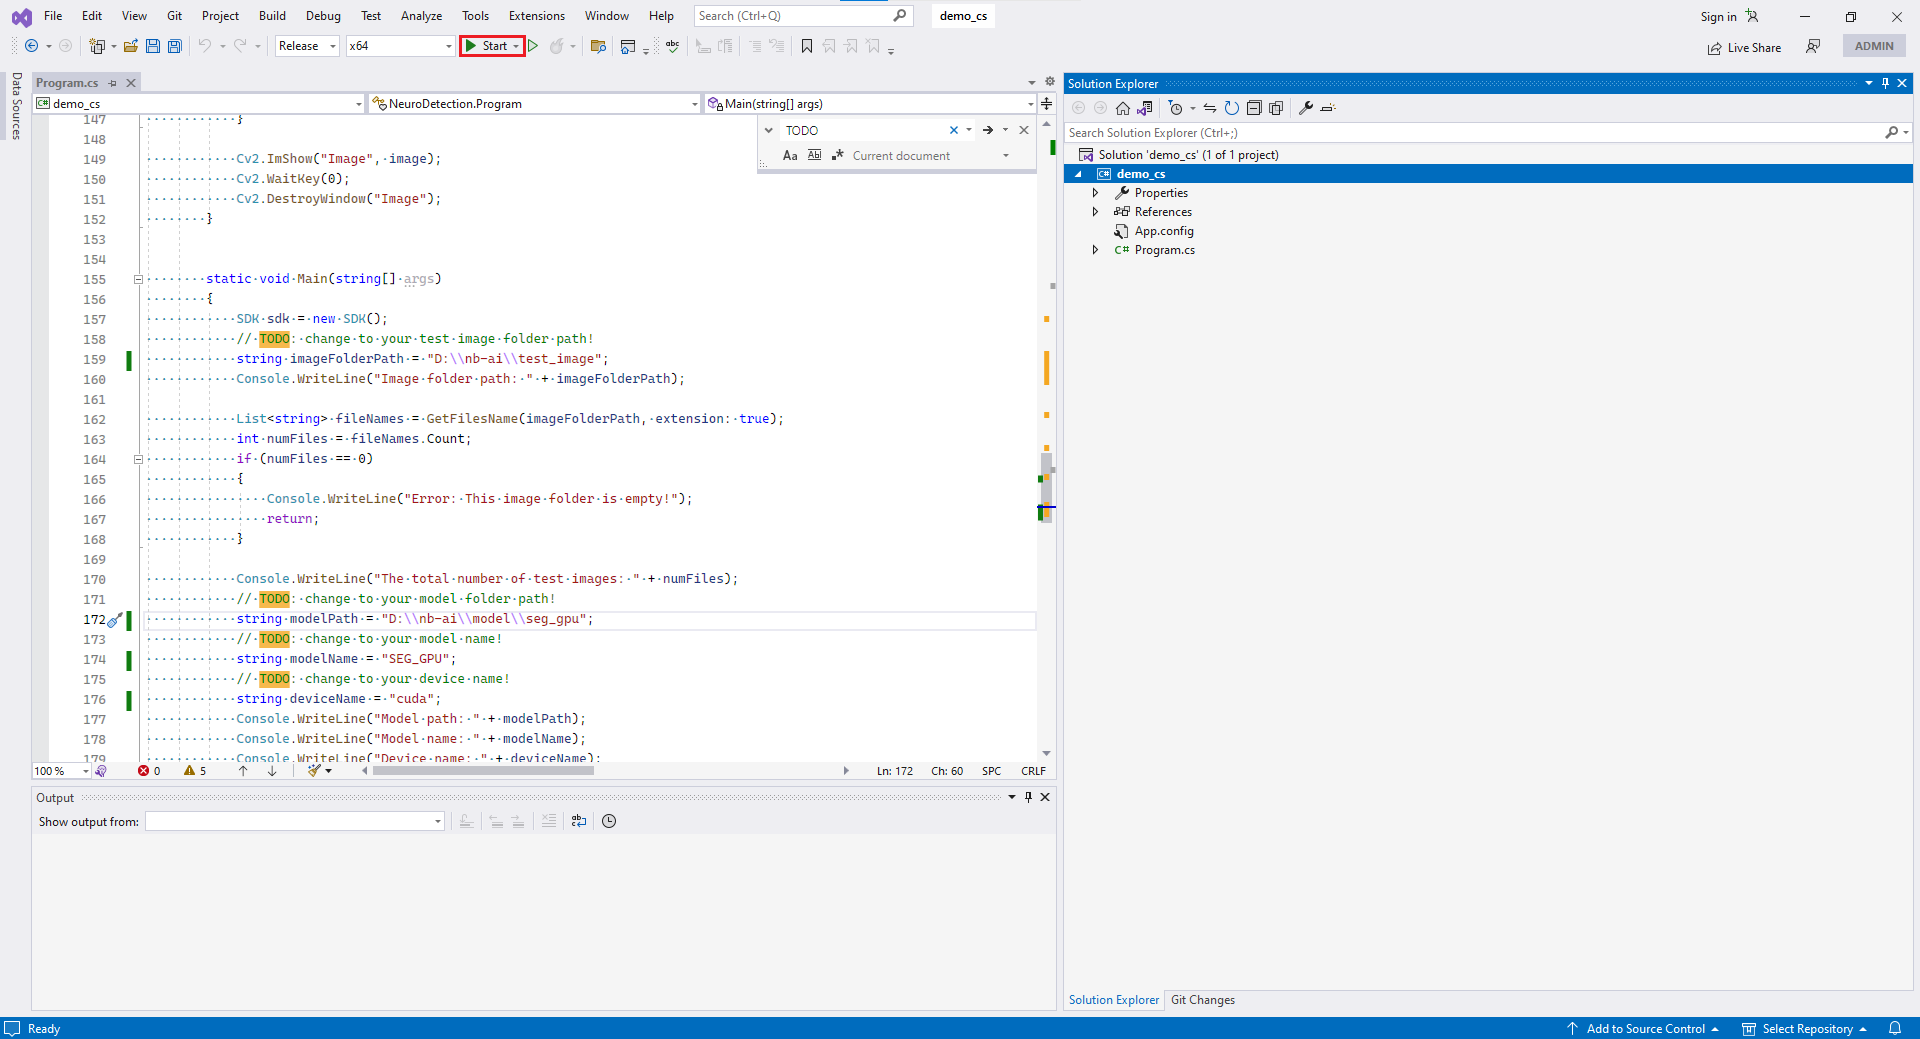
-
If the program runs successfully, the command prompt interface will display similar information as follows:
Image folder path: D:\nb-ai\test_image
The total number of test images: 63
Model path: D:\nb-ai\model\det_gpu
Model name: DET_GPU
Device name: cuda
input device: cuda
infer device: cuda
[2023-06-14 15:27:11.899] [logging] [info] [model.cpp:35] [DirectoryModel] Load model: "D:\nb-ai\model\det_gpu"
[2023-06-14 15:27:12.021] [logging] [info] [inference.cpp:44] {
  ...
}
[2023-06-14 15:27:12.773] [logging] [warning] [trt_net.cpp:24] TRTNet: Using an engine plan file across different models of devices is not recommended and is likely to affect performance or even cause errors.
[2023-06-14 15:27:13.844] [logging] [info] [inference.cpp:56] ["img"] <- ["image"]
[2023-06-14 15:27:13.844] [logging] [info] [inference.cpp:67] ["post_output"] -> ["dets"]
Batch size: 1

Reading the image: D:\nb-ai\test_image\000B16302318AE4F083DC80A6EA69EF75014582.bmp
Image size (height, width): 2048 2448
results in the 0-th image:
  bbox_count=100
[CPP][get_result_mask_cs]Error: the returned mask is empty.

label:                              screw
label_index:                        0
confidential score:                 0.9995336
position of result(x0,y0,x1,y1):    (145.2008, 44.06215, 599.7194, 494.3687)
row_index:                          0
col_index:                          0
mask_width:                         0
mask_height:                        0
mat_mask_width:                     0
mat_mask_height:                    0
...
-
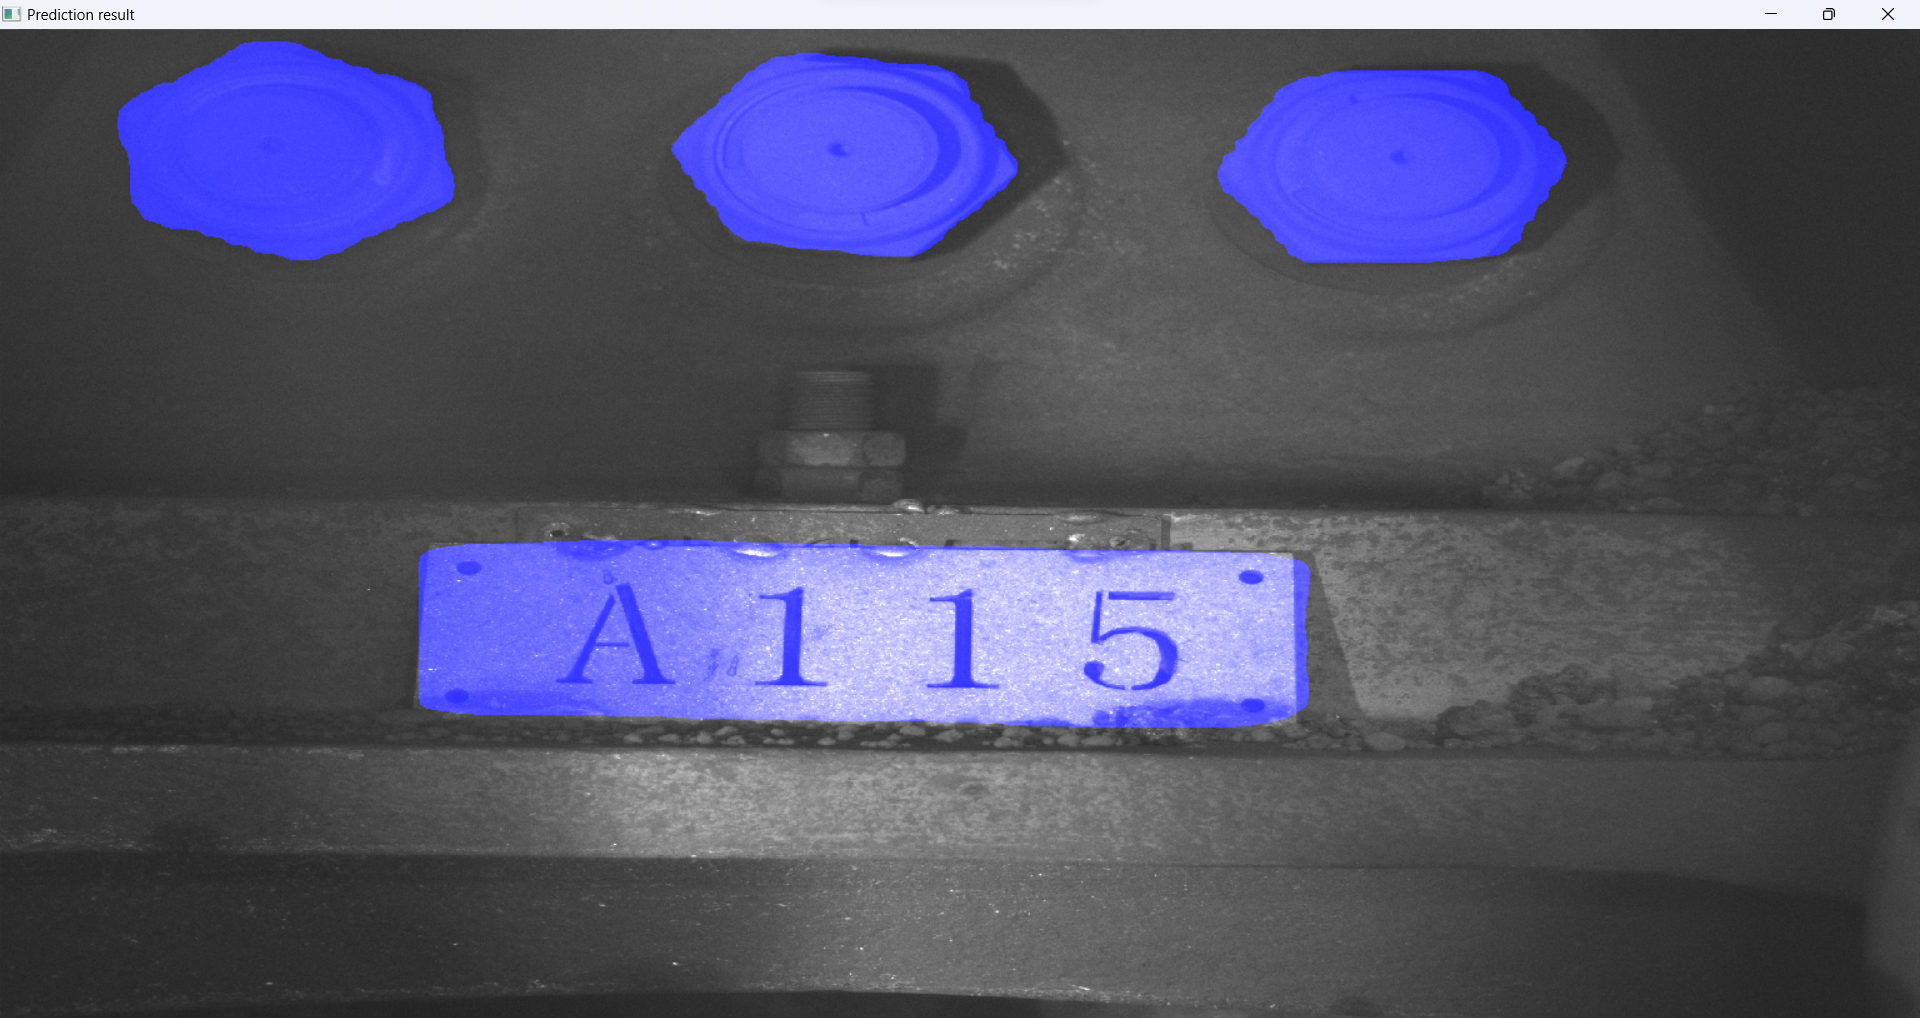
The prediction results of test images will be displayed in a pop-up window, for example:
-
Congratulations! Now, you have successfully completed C# software development using the SDK.
4. Function Call Explanation
4.1 LoadModel()
-
Definition:
- This function is used to load the model.
-
Parameter Explanation:
| Parameter | Explanation |
|---|---|
| modelName | Model name |
| modelPath | Model folder path |
| deviceName | "cpu" for running CPU; "cuda" for running GPU |
| deviceIndex | Specify which device you want to use if you have multiple GPUs. Default is 0. |
- Return value:
- The function returns an integer variable. 0 indicates a successful execution, while other numbers represent error codes. The specific error codes are as follows:
| Return value | Definition |
|---|---|
| 0 | Successful execution |
| 1 | Configuration file not found |
| 2 | Batch parameter not found |
| 3 | dete_thres parameter not found |
| 4 | Class parameter not found |
| 5 | Missing required DLL files for execution |
| 6 | ARG - NVIDIA GPU error |
| 7 | Not supported |
| 8 | Out of bounds |
| 9 | Insufficient memory |
| 10 | Model-related files for loading do not exist |
| 11 | Loading failed |
| 12 | Status count |
| 49 | Model type error or unable to read model.conf file |
| 100 | The model device_name parameter type is incorrect |
4.2 GetBatch()
-
Definition:
- This function returns batch (the number of samples processed in a single iteration).
-
Parameter Explanation:
| Parameter | Explanation |
|---|---|
| modelName | Model name |
- Return value:
- The function returns an integer variable, which is the batch of the model.
4.3 PredictModel()
-
Definition:
- This function is used to perform model prediction on test images
-
Parameter Explanation:
| Parameter | Explanation |
|---|---|
| modelName | Model name |
| mats | Test images stored in an array of OpenCvSharp.Mat |
| detectThreshold | The detection threshold is the value that determines if an object is considered a detected target. The default value of detectThreshold is -1, which means that the default detection threshold is 0.7. |
- Return value:
- The function returns a class called
PredictionResult, which is shown below.
- The function returns a class called
    // Bounding box
    // (x0, y0) coordinates represent the upper left corner of the bounding box
    // (x1, y1) coordinates represent the lower right corner of the bounding box
    public class Boxes
    {
        public float x0;
        public float y0;
        public float x1;
        public float y1;
    };


    // Detection results
    // For OCR and Object Detection tasks, results are bounding box (box), confidence level (score),
    //                                                 and category (label, label_index)
    // For Pixel Segmentation task, results are bounding box (box), confidence level (score), category (label, label_index),
    //                                          and pixel segmentation image (mask, mat_mask_width, mat_mask_height)
    public class DetectionResult
    {
        public Boxes box;                   // Bounding box containing the detected object
        public float score;                 // Score after predicting, ranging from 0 to 1
                                            // The closer the score is to 1, the better the result is
        public string label;                // Target's label name after predicting
        public int label_index;             // Index of the label
        public Mat mask;                    // Mask of the the detected object
        public int row_index;               // No specific use right now. It's for the future development
        public int col_index;               // No specific use right now. It's for the future development
        public int mask_width;              // No specific use right now. It's for the future development
        public int mask_height;             // No specific use right now. It's for the future development
        public int mat_mask_width;          // Width (#cols) of the mask
        public int mat_mask_height;         // Height (#rows) of the mask
    };


    // Prediction results returned by PredictModel() in C#
    public class PredictionResult
    {
        public DetectionResult[][] outResults;   // final results
        public int status;                       // status after prediction
    };
The specific status codes are as follows:
| Status | Definition |
|---|---|
| 0 | Successful execution |
| 1 | NVIDIA GPU error |
| 2 | Not supported |
| 3 | Out of bounds |
| 4 | Insufficient memory |
| 5 | Relevant files for prediction do not exist |
| 6 | Prediction failed |
| 7 | Status count |
| 8 | Unable to retrieve predicted labels |
| 9 | Mismatch between the number of predicted labels and the number of results |
| 50 | License file does not exist or have no permissions to read |
| 51 | Incorrect license file format |
| 52 | License file fingerprint mismatch |
| 53 | The license start time has not been reached yet. |
| 54 | License expired |
| 55 | System time has been rolled back |
| 56 | No write authorization file permission |
| 57 | Unknown errors related to authorization |
| 58 | The license file version is different from the SDK version |
| 59 | The number of tags exceeds the limit |
| 60 | The authorization was not queried (possibly due to failure to load the model) |
4.4 DestroyModel()
-
Definition:
- This function is used to clear the model from the GPU.
-
Parameter Explanation:
| Parameter | Explanation |
|---|---|
| modelName | Model name |
- Return value:
- None